The Cabin

The Cabin

Wednesday, August 22, 2012

Gazeboblog - Episode 6 ... Traftors


Hey, man ... it's like hovering in mid air or something, man....far out!  Today I set up the log rafters ... or trusses...or traftors. I'm not sure what they are called, but I put them up anyway. The rafters are 6"x6" D-logs like the ones we used to build the shop. I first had to plane off the tongues and grooves one every frigging 11' log. That "king post" in the middle is hexagon-shaped and is 11" thick. The whole mess is screwed together using 8' log screws. 

I will be adding some additional log rafters to fit in between these, so that my span will not exceed 48". The roof decking will be 2x6's. I am also going to have openings at the peak, so campfire smoke can escape. There will be a cupola covering the openings. 


Deb is doing her usually superb job rocking the pillars. As you may recall, these "river rocks" are the ones we are making using the rubber molds and concrete and coloring powder. It is quite an art form trying to make rocks look like rocks. We're getting better... and the price is right!

Wednesday, July 25, 2012

Gazeboblog Episode 5 - Taking Shape

 Taking time away from golf, fishing and camping trips, we took some time to make more progress on the gazebo. After mortaring down the caps, I notched the tops of each post and set them on top of the pillars.

The header beams were then notched to fit the posts and then delicately set on the posts using the tractor. I then made the knee braces and attached them using log screws.


We have also made good progress making our river rock to cover the concrete pillars. It is interesting experimenting with the various colors. I am intentionally not showing you the "reject" pile for a good reason :)

Sunday, July 1, 2012

Camping the California Loop

Collier State Park, Chiloquin, OR
We just returned from a grand 3-week trip exploring the backroads (i.e., avoiding the freeways) through Oregon and California. The highlight of the trip was seeing Uncle Burton and Aunt Helen for their 70th wedding anniversary in Palm Desert... or perhaps it was visiting brother/sis in law Dan and Diane at their mountain retreat in Sky Forest, CA ... or perhaps it was Disneyland. Nevertheless, is was a great and trouble-free trip in the Nashinator. 


After a stopover in Monroe to check out the house, we headed south and cut over to I-97 through Oregon, stopping at Collier State Park, in Chiloquin, OR and visited Crater Lake. Most of the loop road was still closed due to snow, but we did see the gorgeous lake and visitor center. Collier was an excellent campground with miles of hiking trails and a cool logging museum. 

Crater Lake
Crater Lake Lodge
Heading further south into California, we stopped at Eagle Lake and camped with good friends Wayne and Nan Miller. We had a good opportunity to test the soalr panel as the site was dry camping and it managed to keep up with demand just fine. Unfortunately, Wayne scared off the fish when they saw his legs in the water, but otherwise we had a great 4-night stay.

Logging Museum Collier SP, Chiloquin, OR

Logging Museum Collier SP, Chiloquin, OR


We headed on down 395 stopping overnight in Bishop before landing at D&D's place at Lake Arrowhead. As usual, we had a great time there, including attending Burt and Helen's 70th wedding anniversary. It was cool seeing our cousins Craig, Larry and Ron for the first time in at least 20+ years. We also visited Disneyland and it was as magical as ever. 


Dan, Dana and Kyle at Dland
Magical Disneyland

Camp site at Eagle Lake
Disneyland
Camping Eagle Lk
Camping Eagle Lk


Beach Eagle Lk


70th anniversary - Cousin Craig Reed on Left


70th anniversary - Dan with cousin Larry 
Empire Mine Site
Empire Mine Site
Empire Mine Blacksmithy


Empire Mine shaft

Empire Mine shaft


Park at Empire Mine SP

We had originally planned on heading home via Zion NP and Salt Lake, but upon Dan and Diane's suggestion, decided to go home though the California gold country...Hwy 49. It was a fun and worthwhile trip even though D&D failed to tell us about the hills and switchbacks in a couple of areas. It is also a much more interesting route than I-5 or even 99 through most of California.

As we headed north, we first visited the historic towns of Jamestown and visitied the living museum town of Columbia State Historic Park. En route we stopped at the Marshall Gold Discovery SHP, the site of Sutters Mill. Northeast of Sacramento, we stopped near Grass Valley and walked the town oif Nevada City. We also saw the Empire Mine State Park, which is a tour of an old hard rock gold mine. I highly recommend seeing this place. 


Columbia State Historic Park

Columbia State Historic Park

Columbia State Historic Park

49er Campground Columbia, CA

Sutters Mill


We then headed north and scooted up Oregon 97 to Washington 395, then home.

Friday, June 8, 2012

Gazeboblog - Episode 4 - Logs, Caps and Rocks

"Getting ready" to actually build the gazebo is apparently taking way more time than I think erecting the building will be. These past couple of weeks have been spent downing trees, cutting them up, hauling them and peeling off the bark. We learned we really like peeling logs in the spring because it comes off really easy, with a little effort using the spud. We now have all of 12 large logs ready for the post and the headers that will go around the circumference supporting the rafters. We will need to do a little touch up peeling with the draw knife to remove darkened areas once they are drier.


At the same time, I have experimented making the pillar caps. At first, you may recall that the form was sloped to a 12" square spot for the log .... well that attempt failed because we couldn't get the cap out of the form without busting it. So I ended up with plain 22" square x 2 1/2"h caps. I also added a wire screen on the inside to add strength. I used some brownish concrete coloring and did my version of exposed aggregate, which didn't turn out exactly like exposed aggregate, but more of a gnarly brownish rock look, which I think might be better anyway. So far 3 are done, and I made a fourth today. Need to make 2 more.


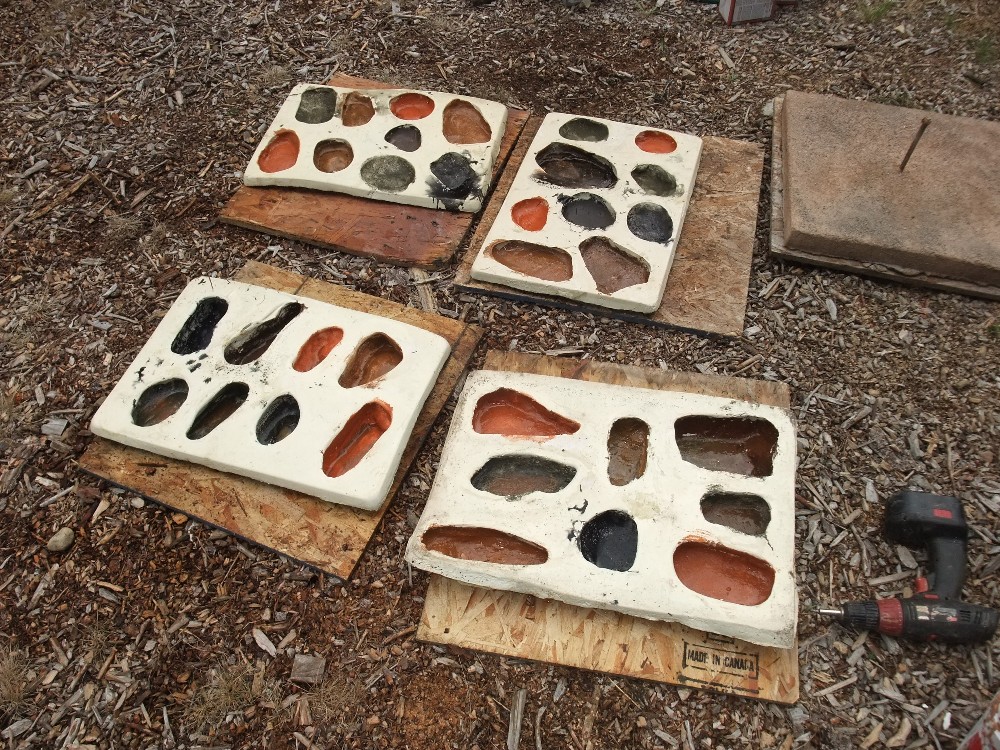
We also did our first trial with the river rock "cultured stone" molds. They are a latex material which were made using real rocks as molds. I first sprayed the inside with water, then "painted" on various iron oxide powdered pigment colors on the inside of each mold. We bought light, med and dark shades of brown, tans, black, and we have a bit of green. Most of this color is supposed to wash off, leaving a light coloring on the rock. (we'll see!) Each form makes 2 sq ft and we need to make about 100 sf, to we need to make about 12 sets of four molds.


Thursday, May 24, 2012

Gazeboblog - Episode 3 (Stonehenge West)

Today I finished the six pillars for the gazebo. So each pillar is made up of (12) 8"x16"x8" "CMU's" (Concrete Masonry Unit).  They are sitting on 5" thick 2' square footings which were buried 2' under ground. The pillars extend 3' above the ground. In addition to being mortared together, two of the four holes are filled with concrete and rebar. These puppies are stout. 


I also built a form for the pillar caps and did my first test cap. I looked into buying these caps at a masonry company, but they wanted $70 each for them. The caps are 22" square and have a 12" square spot for the log to sit on, and then they slope down slightly to drain off rain. I added a bit of brown color and plan to make them exposed aggregate style (more on this later). We'll see how it goes later tonight when I remove the form.

Wednesday, May 16, 2012

Gazeboblog Episode 2

Having no more excuses, today I "dug in" and finished digging the remaining two (of six) footing holes for the gazebo. The first hole had a giant root going through the middle that I had to chainsaw out and pull up with the tractor. The second hole had a huge boulder (too heavy to lift out without the tractor. But I got er done. I then poured the footings, which are about 2'x'2' x 6" thick. Two 80# bags of concrete. The tricky part is making sure the top of each footing is level with respect to the other 5 footings. Mine are dead on ... within an inch anyway. Hey, it's just a gazebo!


Then I started in on the concrete blocks. These are 8" x 16" x 8" blocks. Each pier will be 6 blocks high  (48"+mortar), so 12 blocks/pier. This is the first time that I have ever worked with these blocks to build something like this. I'm not very good at it, I decided. But I got three of the piers started (two blocks high each), and they seem to be ok. Once i get all six base piers done, I'll pour concrete down the inside of the blocks and add more rebar. 
We are still investigating the river rock for the outside of the piers. Regular 'cultured stone" can cost upwards of $7 a sq ft, and we need 120 sq ft. We can get some on Craigslist for around $3.50-$4, sqft. The direction I'm currently leaning is to make our own rocks using rubber molds and concrete. This way we can make rocks for the greenhouse and around the foundation walls of the new house. This is the mold brand we are considering: http://www.stonecasterstudio.com/index.html  


Sunday, May 6, 2012

Gazeboblog ~ Episode 1

So the gazebo in nearly done .... no wait  ... this is just an example of what we want to build - we just started the project today! Geez!


Yesterday we determined where the center will be, then made an outline of the circumference. Then we marked where each post will go. I then dug the holes for two of the six footings. 

The gazebo will be hexagon shaped and 16' across. A hexagon is of course a polygon with six sides and six vertices, but it is not to be confused with a sexagon, because a sexagon is a gazebo you have sex in ... so with any luck, this will be both a hexagon and a sexagon! But I digress ...

As in the example our gazebo will have six 16" x 16" concrete pillars going up to 3' above the ground. The pillars are going to be made from 8"x16" cinder blocks, sitting on 2' square' footings buried 18"-24" deep. We plan on covering those pillars with river rock. Log posts will sit on those, supporting log beams going around the perimeter of the gazebo. The rafters will also be log.

Our gazebo will not have a floor like most do. It will be natural ground that we'll cover with wood chips.

Next week, I'll start the concrete work using this nifty mini cement mixer I bought. It's capacity is 1.25 cf, which is enough for two 60# bags. I will mix one 80# bag at a time.

A real handy tool to have for this kind of project is a good quality spinning laser level. You can fairly easily determine the correct level for each footing and make them all the same. Unfortunately mine is a cheap one I bought at a Times employee auction. (Frank Blethen I want a refund!) You can barely see the laser more than 5' away in daylight, so this one is mostly for indoors. If I slow the spinner way down, and block the sun, and use a white stick to measure the height, it works ok.