The Cabin

The Cabin

Saturday, October 29, 2011

Log Cabin Wood Shop - Roof Frame Completed

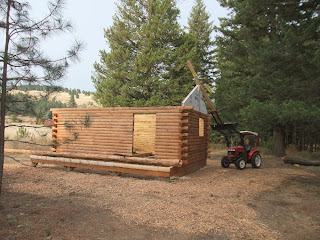
Apparently, we accomplished quite a bit since our last post a week ago. Since then we have built and mounted both gable ends, set the ridge beam along with two inside cross beams and posts, put in all of the rafters, and started blocking on one side. The rafters are 2x8's on a 6/12 pitch with about a 10' span. I had originally planned on needing hangers along the ridge for the rafters, but ended up with a nifty "birds mouth" notch at the top of each, so they sit partially on top of the beam. I was able to do this because I decided to use double 2x10's instead of house logs stacked.


There are two doubled 2x8 cross beams spanning the width of the shop, on which I have 5x5 posts sitting to help support the ridge.

Today was plane and stain day. I needed to plane about 50 1x6's down to close to 1/2" to be used for the exposed soffits. The rest of the roof not seen will be 1/2' OSB. I also had to plane (10) 6 1/2' house logs removing the tongue and groove, to be used for the porch rafters.

We also finished cutting the last porch beam support log posts, 4 total about 10" diameter. Deb spent the last several days removing their bark and using the draw knife to get them down to the wood for a "skip planed" look.

Debbie also did a ton of staining as today may be the last "warm" day of the season (above 50 degrees). This included the porch rafters, all of the soffit material and the facias. So everything will have one coat of stain going into winter.

Next job is to put in the front deck joists and flooring in preparation for the log posts and beam.

Friday, October 21, 2011

Log Cabin Wood Shop - Roof Begins

Today we set the gable ends (triangle pieces on the end of the building) on top of the log walls. To do this I erected a "boom" onto the tractor's loader. Deb guided the gable ends into place and I gently set them on top. I pre-built the gables in the garage including OSB (oriented strand board) sheathing and the Tyvek house wrap covering the OSB. There is a notch at the top of each to hold the ridge beam. They were pretty heavy, so I wasn't exactly sure that the boom arrangement would actually work... but it did great!


Up until today, we've been busy bleaching, trimming, caulking and staining the logs. The bleach/water mixture (1:3) did wonders with the sun-darkened logs. I included a "before" picture below to show the difference.


So now, we have one coat of stain on the outside (using Permachink's Lifeline "Dark Natural" stain), and one on the inside using Behr Log stain. Deb did most of the staining. We caulked before staining using a latex/silicone combo caulk which matched the stain really well. Now, aside from missing the roof, the cabin is winter ready. we want to get one more coat of stain on the outside before it's too cold to stain.


Next job will be to put up the ridge beam and start setting rafters into place.

Wednesday, October 12, 2011

Log Cabin Wood Shop - Log Walls Completed

Today was an exceptionally good day (they're all good, or course) as I finished the log walls. 18 log
courses using about 100 logs. I am looking forward to starting the roof.

Next step for the roof is to build the ridge beam and post structure. We also need to get the log porch beams and posts done and up.


You'll see that the logs extend on the gable ends longer than the normal amount. This is to accommodate an 18" roof overhang. The ridge beam will extend the same amount.


Those last few top lops were quite a stretch for the tractor, even with the forks. But it really helped get the logs high enough, so all I had to do was lift the ends into place.


We ordered some log stain (Permachink Lifeline Dark Natural), and we hope
the weather will continue to be nice enough to get the logs cleaned, bleached, caulked, and stained before winter.

Fall is definitely here, with cooler days and nights, but for the most part it has been clear and nice. We plan to get a little more golf in before winter, so tomorrow is a day off. We also are planning a trip up to Colville to Webley Lumber to get the rafters, 2x6 tongue and groove flooring, and other lumber to frame in the roof.


Tuesday, October 4, 2011

Log Cabin Wood Shop - Taking Shape

The shop is progressing nicely. We are now on the 11th course of logs (of 18) and the windows have begun. We will have one 3'x3' window on each side. It is getting to the point where lifting the logs into place is a bit difficult, so we'll probably start using the tractor to lift them adjacent to the wall. Why fight gravity if you don't have to.


These house logs were pretty inexpensive (relatively) so I expected to have some that were bowed, warped or twisted ... and I was not "disappointed", although so far most are ok. I did have a problem with a hump along the back wall that I dealt with using a hand planer. At the
peak, it was 3/4" too high.

Meanwhile, Deb continues to debark logs. We took down a second standing dead tamarack tree, which turned out to be too big in diameter and too curvy. We may get one or two of the posts at the top end, then save the remaining log for the house. She used a spud and a draw knife to do the debarking.