The Cabin

The Cabin

Sunday, November 9, 2014

A New House – Episode 15 – Doors, Decks and a Fireplace

Holy cow I can’t believe it’s been a whole month since my last post on the house.

Since the roof is (somewhat) protected for winter, it has allowed us to slow down the pace a bit. The final “close the place up” tasks are the doors, so that has been a priority. Deb spent many an hour pre- staining the doors so they can withstand the weather. As I mentioned in last month’s post, we were lucky to find surplus fir french doors at a place in Spokane.

Installing the doors takes patience, as you are somewhat at the mercy of the bum who did the framing. Setting it plumb and square and screwing it to the framing using shims is the short version, but the door has to close nice and even against the seals.

P1010673

Kyle’s room is on the main floor, and will have a deck outside looking toward the lake. His door has internal blinds.

P1010676

P1010675

The basement door is an 8-lite fir french door. We had at first planned to put in a double door, (I was planning on a sliding door), but the opportunity to get this door relatively cheap was too good to pass up.

P1010692

The front door is a fiberglass door that has a nice mahogany grain and finish. We decided against a wood door because this side of the house gets the most weather and we were concerned that the finish would not hold up well.

 P1010693

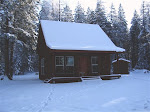
Like my nice porch there?

The last door to be installed was the double french doors for the family room. That roof did not have an overhang because the plan is to have a porch roof. As a result, if we installed that door as-is, the door would get pelted by winter. So…. we decided to go ahead and build the deck and porch roof.

P1010679b

The first step was to pour two sonotubes for the deck/roof middle and outside supports. One end support is a 4x6 treated beam anchored to the foundation and framed wall.

This deck and roof would not have been too hard of a task, except for the fact that we were planning a log theme to match the overall look of the house. So … we had to cut down a couple of trees to get the logs we needed for the posts and beam.  We then had to peel the logs and notch the top of each post to match the contour of the beam.

P1010680

The log beam is 12” diameter, 16’ long and green, so it was rather heavy. Luckily our plan to devise a boom on the tractor to lift each end into the posts worked well. (scary but it worked). For the next beam I’ll use a tripod lift instead.

P1010681

P1010683

A big sigh of relief when it was up and stable. Once the beam was up, we put up the roof rafters, plywood and underlayment. Now we have a dry cover for the new french doors.

P1010687

Next was the deck framing, all done with 2x6 treated lumber. It should outlast me. The deck surface is “Elite Decking” which is 2X6 high grade treated fir decking.

   P1010689

a room with a view.

P1010690

Lastly, we decided to go ahead and install the fireplace to hopefully keep us warmer during the winter while we’re working. We’re expecting night temps in the teens this coming week, so hopefully, even without insulation, it will take some chill off inside. First step was to prep the chase by installing a fire stop metal piece near the top and then insulate the chase with rockwool.

 P1010677

Then we took advantage of Ben and Jen to help us lift this puppy into it’s spot. 430 lbs. Ben took most of the weight.

    P1010686

This week we had good weather and installed the flue, cap, and blower assembly … then started our first fire.    Yay!

Tuesday, October 7, 2014

A New House – Episode 14 – Doors and Windows

Our goal this year is to get the house closed in and winter-ready. Now that the roofing underlayment is on, we’re protected up on top, but still need to get the doors and windows on to make it completely closed up and breeze-free.

P1010662

We have 21 windows and 4 exterior doors. (That black covered opening on the right of the front door is for a stained glass window that Deb made). Notice that nifty covered porch I made for the front door?  It has spindly logs for posts, but it should last through winter .. or not.

P1010672

The windows we chose are Milgard Montecito vinyl windows in tan color. These Milgard windows carry a lifetime warranty. We also got the best glass quality we could afford which is low E3-366 Argon made by Cardinal. (Here is a description for those who are interested). Basically they are really good at keeping the house cooler in summer and warmer in the winter.


P1010657

We are installing the windows using techniques we learned from various sources which basically completely seals the windows from the outside elements and at the same time ensures that rain cannot get inside. We  start by laying down flexible butyl flashing material on the bottom of the sill folded over the Tyvek.

 P1010658

Then we caulk the inside of the window flange and set the window in the opening, endure it is level and plumb, then nail it in along the sides and the bottom.

 P1010659

After installed, we apply more flashing down the sides covering the flange and the flashing on the bottom. Then more flashing along the top flange covering the top edge of the side flashings. Then the Tyvek that was folded up, is folded back down and everything is taped shut. What you end up with is a system that ensures rain will “shingle” away from the window openings.

 P1010660      P1010666

We got all of our doors from a surplus door and window place called Overhauser’s. You have to do quite a bit of picking through his billions of doors on six floors in an old brick warehouse in Spokane, but we figure we saved upwards of $2000 on surplus doors that basically look like new. Three of our doors are full lite fir doors. This one for Kyle’s room does not have grids, but has integral blinds.

 P1010667

Basement door on the left and one of two french doors for the family room on right.

 P1010668

The other half of the family room french door. We are using a natural color Sikkens Door and Window stain, which is pricey, but we hope will work well in our climate. Deb is putting three coats on and you can touch it up every couple of years as needed (unlike doors that are varathaned or varnished).

P1010671 

The front door we chose is fiberglass. After extensive research, we decided against a wood door for the front because it faces exactly the direction storms come from in winter and will get afternoon sun in the summer…even when we complete the porch roof. Even the best stain and sealants can’t fight mother nature. This door is prefinished and has a really nice mahogany grain.

   P1010665

One other little task I am working on is blocking off the eave openings, mostly to keep the weather/wind out in the winter until we can get the soffits up, but also to keep bugs out. There is a 1” slot on the top edge of the blocking to allow air flow to the roof ridge above the insulation layer.

Friday, September 26, 2014

A New House – Episode 13 – Just in time … sort of

Ok – now everyone take a deep breath with me. Inhale … exhale. Whew! now we can relax and not stress over working on the house. We set a goal this year to get the roof on before winter…. and we did.

When we last met, we had framed the roof rafters and started on framing the side walls of the shed dormers. Before sheeting the roofs, there is quite a bit of detail work that needed to be done. A lot of that work can be done from the second floor. One task was to complete the side wall of the dormers (so you’re not trying to do it while perched on a 10:12 roof) Those side walls actually sit on a set of doubled 2x12 rafters. A real pain to frame and sheet as everything is has double angles of 5:12 and 10:12.

P1010648

To create the gable overhangs for the main roof and the dormers, we built “lookouts” which are 2x4’s laying flat passing from one rafter, through a notch in another next to the wall and out past the wall. Then either a 2x6 or 2x8 “barge boards” are nailed to the outside edge of the lookouts.

 P1010649

Building lookouts.

 P1010650

Lookouts

  P1010652


 P1010651

At one point our roofing supplier “Custom Bilt” came out to form (extrude and cut) the metal roofing. This is the same company we bought from when we built the cabin. This machine takes the raw coil of 26 ga sheet metal and runs it through a forming machine that creates the profile we need. then according to my cut list runs them out and cuts each sheet. We will be using 12” snap lock roofing in antique patina color. Same as the cabin.

 P1010653

This is about 2500 lineal feet of roofing.

…………………………………

Insert imaginary pictures here showing progress make while Deb was lollygagging in San Diego with her sisters. I was too busy and/or forgot to take some pictures that week.  But that week I finished the dormer side walls, finished the lookouts, and sheeted 3 of 5 remaining sections of roof.

 P1010654

But when she got back, we had two more sections of plywood to finish and wanted to get it done that day, as we were expecting some rain that night. But … we literally had one last piece of plywood to put down when a huge deluge of rain came (while Deb was out on the ladder) One thing to note is that as we sheet the plywood, we are also stapling down the underlayment..for two reasons … one because it protects the plywood, and second because we could do that from the second floor  and not have to get up on the steep part of the roof (much).

P1010655

But we did it, and the rains kept coming and we didn’t give a damn … the house is nice and dry. Next step – windows and doors.

Saturday, September 6, 2014

A New House – Episode 12 – More Roof Framing and Tyvek

These past few weeks we have sure noticed the season changing from summer to fall. Cold nights and moderate days are in stark contrast to the 100 degree days of summer. The downside is that it means winter is coming and we’re feeling the pressure to get this roof on. Every time it rains we squirm as we see water puddling up on our nice plywood and getting everything wet.

Nevertheless, progress progresses and we are steadily getting closer to our goal of getting the house “weather proof” this year.

P1010634

The first step is getting the hangers up on the ridge beam … in the right place relative to the wall, so they end up at right angles to the ridge beam. I wish my ladder was a bit taller for this.

 P1010637

We got help from the tractor getting the rafters up to the second floor. Deb at the bottom, raising the bucket with a rafter sitting inside – and me at the top lifting it the rest of the way. The rafters are 2X12’s 16’ for the dormers and 20’ for the main roof.

 P1010638

Cutting the rafters is a bit tricky. This is a “birds beak” cut that sits on the wall for the dormers. It sits pretty low on the wall so the rafter tail end up at a 2X6 dimension.

P1010639

Dormer rafter.

 P1010640

When it comer to putting up rafters, geometry is your best friend. The dormer rafters are a 5:12 pitch so that for every 12’ horizontally, the rafters go up vertically 5’. Using a framing square you cut the various angles using the same ratios – but in inches. Same with plywood on angles – a 10:12 pitch means the same as 36” across and 30” up.

 P1010641

In this shot you see the dormer rafters sitting on their wall, and the main roof rafters at their 10:12 pitch, sitting on the 3’ pony walls.

 P1010642

There are a lot of details to finish before we can put up plywood. For example, all of the overhangs have to be built for the dormer as well as the main roof.

  P1010644

The dormers need to be framed, sided and Tyvek’d and it is easier to do that when we can get to them from the second floor

  P1010646

Debbie has been kicking butt, getting the Tyvek up – crucial to the house staying dry during the winter. With the exception of some small pieces on the dormers (yet to be completed), she finished today. 

Wednesday, August 20, 2014

A New House – Episode 11 – The Roof Begins!


The past couple of weeks was focused on the start of roof framing. In order to be ready to set the ridge beams, we first had to build a load bearing wall on the 2nd floor, complete the framing of the chimney chase, and add some various post supports and blocking.

Last Saturday, the crane truck came and we finally were able to lift the ridge beams into place. The main building ridge beam is a 32’ 4”  x 14” LVL (laminated veneered lumber) beam, which looks like a big hunk of plywood. The rafters will sit against it with hangers, so it will not be visible when completed.

P1010591

 P1010593 P1010594

Deb and I were on ladders at each end holding ropes and guiding the beam to gently settle into the pre-make slots on the gable end walls. It fit perfectly.

P1010596 P1010597

The family room ridge beam is a nice looking douglas fir beam, 15’ long and is 6” x 12”, which will be exposed – so the rafters sit on top of it. We sanded and pre- stained this beam, hoping any weather we get until we get it covered will protect the beam

P1010599

P1010600

With the beams in place, we launched into the framing of the family room roof. In this photo Deb is measuring the “lookouts” which hold the outside rafter up. The lookouts sit on top of the gable wall.

P1010601

You might also see plywood gussets bridging the rafters at the peak, and blocking in between to keep the stable under load.  

P1010603

A pretty girl on a roof.

 P1010604

I cut the osb on the ground, and slid them up the ladder to the roof. Full size 4X8 sheets are a bit of a chore.

 P1010605

 P1010607

Deb is really good at nailing.

  P1010609

Both sides of the family room roof are now framed and sheeted. We still need to put down the roofing underlayment. We used to always use tar paper, but for this project we’re going with a high tech synthetic product.

 P1010611

Last thing we did today was put Tyvek on the side wall. We did this because we already had blocking in place on the roof.

P1010613

An inside view of the family room with new chimney chase, ridge beam and a new roof.  Just as were finishing, it started raining.