We are still investigating the river rock for the outside of the piers. Regular 'cultured stone" can cost upwards of $7 a sq ft, and we need 120 sq ft. We can get some on Craigslist for around $3.50-$4, sqft. The direction I'm currently leaning is to make our own rocks using rubber molds and concrete. This way we can make rocks for the greenhouse and around the foundation walls of the new house. This is the mold brand we are considering: http://www.stonecasterstudio.com/index.html
The Cabin
Wednesday, May 16, 2012
Gazeboblog Episode 2
Sunday, May 6, 2012
Gazeboblog ~ Episode 1
So the gazebo in nearly done .... no wait ... this is just an example of what we want to build - we just started the project today! Geez!
Yesterday we determined where the center will be, then made an outline of the circumference. Then we marked where each post will go. I then dug the holes for two of the six footings.
The gazebo will be hexagon shaped and 16' across. A hexagon is of course a polygon with six sides and six vertices, but it is not to be confused with a sexagon, because a sexagon is a gazebo you have sex in ... so with any luck, this will be both a hexagon and a sexagon! But I digress ...
As in the example our gazebo will have six 16" x 16" concrete pillars going up to 3' above the ground. The pillars are going to be made from 8"x16" cinder blocks, sitting on 2' square' footings buried 18"-24" deep. We plan on covering those pillars with river rock. Log posts will sit on those, supporting log beams going around the perimeter of the gazebo. The rafters will also be log.
Our gazebo will not have a floor like most do. It will be natural ground that we'll cover with wood chips.
Next week, I'll start the concrete work using this nifty mini cement mixer I bought. It's capacity is 1.25 cf, which is enough for two 60# bags. I will mix one 80# bag at a time.
A real handy tool to have for this kind of project is a good quality spinning laser level. You can fairly easily determine the correct level for each footing and make them all the same. Unfortunately mine is a cheap one I bought at a Times employee auction. (Frank Blethen I want a refund!) You can barely see the laser more than 5' away in daylight, so this one is mostly for indoors. If I slow the spinner way down, and block the sun, and use a white stick to measure the height, it works ok.
Yesterday we determined where the center will be, then made an outline of the circumference. Then we marked where each post will go. I then dug the holes for two of the six footings.
The gazebo will be hexagon shaped and 16' across. A hexagon is of course a polygon with six sides and six vertices, but it is not to be confused with a sexagon, because a sexagon is a gazebo you have sex in ... so with any luck, this will be both a hexagon and a sexagon! But I digress ...
As in the example our gazebo will have six 16" x 16" concrete pillars going up to 3' above the ground. The pillars are going to be made from 8"x16" cinder blocks, sitting on 2' square' footings buried 18"-24" deep. We plan on covering those pillars with river rock. Log posts will sit on those, supporting log beams going around the perimeter of the gazebo. The rafters will also be log.
Our gazebo will not have a floor like most do. It will be natural ground that we'll cover with wood chips.
Next week, I'll start the concrete work using this nifty mini cement mixer I bought. It's capacity is 1.25 cf, which is enough for two 60# bags. I will mix one 80# bag at a time.
Friday, April 6, 2012
It's all in the foam

The primary bed in the Nash is a full-sized pullout couch-to-a-bed called a "gaucho bed", and for sleeping, this gaucho bed sucks. Kinda odd how a good company like Northwood can make such a fine travel trailer BARELY sleepable beds. I supposed it's for sitting comfort that the density of the seat foam is different that that of the back foam. The problem it that when folded out, that crappy back foam becomes the bed support for one of two people. I found that out the first night driving it home, when I sank down to the plywood and felt like I was in a hotdog bun all night. And, because of the crater I created, Deb was obliged to fall into that abyss as well. So we both ended up in the hotdog bun. Cuddly, but not good for sleeping. The other bed, the dinette-to-a-bed that Kyle sleeps on, doesn't have the problem, because the main cushions are pretty firm.
OK, simple solution. We bought a good full size Coleman air bed. So on camping night one, we pulled out the crappy cushions and stick them in the over head, inflate the airbed, and we're good. Deb and I sleep in a full bed at home. We've also slept in airbeds. We found that there is a difference, however, between queen and full airbeds. There is a lot more "bodily interaction" on a full airbed than a queen airbed ... and I'm not talking about the good kind of interaction. I'm heavier that Deb, so I push the air down, which pushes her up onto a hill, which causes her to tend to roll to center. Cuddly, but not good for sleeping. Anyway, the airbed idea wasn't a great solution.
Plan B.
So back to researching options. We looked at toppers, but that wouldn't alleviate the problem with the uber-soft back foam. We looked at replacing the whole cushion foam set with a futon mattress, but decided that it wouldn't fold properly into a couch form. Some people actually leave the couch folded out in the bed position full time and plop a regular mattress on top. Comfortable, but it completely eliminates the positives of the great floor space in the Nash.
So the correct solution, albeit not the cheapest, is to replace all of the cushion foam entirely. After extensive internet research boning up on the technical aspects of foam, we headed off to the local fabric and foam store to test different foams in the prone, supine and fetal positions. For the sake of this discussion, we're talking polyurethane foam, not latex or other materials.
So as we sat and layed around the store, testing foam samples, we came to the conclusion that our existing cushion SEATS are probably a medium density - medium firmness foam, and the seat BACKs are low/low. The clerk had us test a piece of "on sale" medium firm foam* that flattened right to the floor when we layed on it. So cheap foam is definitely cheap. Finally we agreed that we liked a density around 2.8 and a firmness of around 40. This will make a nice firm mattress, and a hard couch - particularly the backs - but sacrifices need to be made. That store's prices were a little high, so we decided to order via internet.
We ordered all 7 cushion pieces to complete the 52 x 75" gaucho bed from foamonline.com. We ended up with a high resilience foam, with a density of 3.0 and an ILD firmness of 40. Their prices weren't quite the lowest, but they seemed to get good reviews and gave a lot of helpful specs on the their foam, so I tend to trust them more than the cheapest. They do offer free shipping, which helps. Cost was $328 shipped.
We also bought three Alps Mountaineering dual foam pads, which are basically egg crate foam laminated to a high density foam backing. We initially bough one for Kyle as a test and found that these did a great job to soften the feel of a firm foam mattress. So we bought two more. On sale at REI.
So our next camping trip is in late April, when we can test our new foam mattress ... hopefully if we get it by then.
--------------------------------------------------------------------------------------------------------
THE TECHNICAL STUFF
* There are three primary ways to measure foam: DENSITY, FIRMNESS, and RESILIENCE. You can have a high density foam with low fimness, or visa versa. See technical stuff below.
Density is measured in pounds per cubic foot. (lb/cf3). The higher the number the better the quality and the longer it will last. I think of this as the % of foam to bubbles. A low density foam starts around 1 lb/cf3, and high density is around 3 lb/cf3. A cubic foot of medium density foam will weight about 2 pounds.
Firmness, believe it or not is not directly related to density.Firmness is measured in ILD units (Impression Load Deflection), and is measured by taking a disc and pressing into the foam. The more strength the foam has to push the disc back up is its ILD, which is stated as a number value. The higher the number, the stronger the push, so a 30 ILD is stronger than a 15 ILD. A "soft" cushion has an ILD around 15, whereas a very firm cushion has an ILD around 55.
Resilience has to do with the foam's ability to "spring back". A steel ball is dropped vertically on to a test piece and the rebound height measured and expressed as a percentage of the height dropped. As far as I can tell, you can either get high resilience (HD) or regular. HD foam has a resilience above 50%, so that steel ball dropped on it from 24" will bounce back 12".

Tuesday, March 13, 2012
Nashinator ~ Other modifications/additions
Here are a few other mods we have made to the Nashinator 17C.
Built cabinet for DVD player under cabinets and mounted LCD TV. These are above the rear dinette seat.
Used dead space on the right side of the kitchen area, next to the couch/bed to build this magazine, DVD, laptop rack.
Ladder-mounted bike rack
"Indespensible" soap/shampoo/conditioner dispenser in shower
Built step with non-skid strips
So as to not compete with our son's TV when watching TV on the Laptop at night, we like to use wireless headphones. The infrared transmitter is mounted under the flip-up table and 12v is wired back to the power distribution panel.
Monday, March 12, 2012
Nashinator Inverter and Electricity Minutiae

Having pulled our Xantrex Freedom 458 2kw inverter/charger out of the Tioga before selling it, we recently installed it in the Nashinator. Our Xantrex was used when we bought it, which is a good thing because they sell for over $1000 new. For those curious minds, an inverter converts 12v dc into 120vac. A 2000w inverter can give you 15 amps of AC. The Xantrex 458 is also a 3-stage charger with a 150A max output, so it can recharge our (2) golf cart batteries in short time. I pulled 4 awg cable directly from the inverter to the batteries mounted on the trailer's A-frame. These cables were fed under the wood floor, but above the under panel where the insulation is.
Since I wired the inverter into the "general purpose" AC circuits, we now have the ability to plug pretty much anything into an AC outlet and get power without being plugged into street power or running a generator. This is pretty cool to have AC power anytime you want, without the noisy generator running.. Of course the limitation is how much amp-hour capacity you have in your batteries. It does not power the air condinioner, the microwave, or the water heater's 120v element.
The boring math:
Our (2) 6v golf cart batteries have a capacity of 210 ah (amp-hours) when fully charged. But you shouldn't discharge these batteries more that 1/2 of its max capacity, so really it's 100ah of available capacity. (That's 100 amp for one hour, or 1 amp for 100 hours) For every 1 amp of AC power needed, it draws 10 amps from the batteries. (Power=Amps X Volts)
Kyle's 19" LCD TV/DVD combo draws around 30w, or 0.25amps. So for every hour he watches TV, we'd use up 0.25ah of AC power, but 2.5a DC power. If Deb and I are also watching a movie on the laptop, that's 90w (0.75a)/hr AC. So using both, we consume 10 amps/hr from the battery.
But you also have lights (20w), water pump (40w), and (gulp) the furnace (80w) and coffee maker (650w). So based on a "typical" conservative day of dry camping, one might expect to use around 90 amp-hours per day, which is most of the battery capacity you can use.
You can reduce this consumption in several ways:
- Add a solar panel. If you read my previous blog, our 120w panel can provide up to 7 amps per hour, but realistically let's say 3-5 amps average depending on light. Over an eight-hour period of reasonable daylight, that gives you back 30 ah's per day. So now that 90 ah/day consumption drops to 60.
- Go to LED lighting. Those little incandescent lamps really add up. (4) 20w lights running 3 hours per day, consume 20 ah/day. I went to LED lamps that plug right into the sockets and they only draw 3 watts each. so now I'm saving another 17 ah/day dropping daily draw to 43 ah/day.
- Use a percolator or french press for coffee vrs an electric drip machine. Save another 13.5 ah/day, so now we're down to 30ah draw.
- Use a catalytic heater instead of a furnace. Save 13 ah/day. Now down to 17 ah draw/day. These puppies put out a lot of heat and only use propane. We have a "Mr. Heater" portable unit, which needs to be used only with ventilation. The popular brand for RV are the Olympian Wave heaters, which are very safe, but are a more permanent installation and space, which we don't have.
But then all of this is somewhat optimistically theoretical, because there are other losses that draw down such as LP and CO2 detectors, fridge lights, and water heater controllers. A cool thing to have is a Bogart Trimetric Power monitor (see photo-upper). This puppy accurately tracks your rig's % full, voltage, amperage, and/or watts. A very handy tool when dry camping to see what's going on. We also have a Xantrex Control module (center) mounted in the same location which gives you battery status as well as full control over what the inverter is doing. For example, the inverter draws battery amps even when unloaded, so at night or when gone we can turn it off.
The inverter and solar charge controller are mounted under the front seat of the Nash 17c's dinette. This was otherwise somewhere dead space.
Electrical System Before Conversion
Electrical System After Conversion
The replacement LED lamps I am using
Here are some good sites with much more detail on dry camping
Sunday, March 11, 2012
Nashinator Solar Panel
Goes Solar
Since we bought our 2006 17C Nashinator several week ago, we have been incorporating several improvements to it, to make it more livable for us. Those changes include a 2000w inverter/charger, a 120w solar panel, (2) 6v golf cart batteries, monitoring stations, a built in LCD TV and DVD player, a wireless headphone setup, and some storage and other improvements. Following are the details of the solar system:
The solar panel is connected to the (2) 6v golf cart batteries via a charge controller. We have one EMM120w 120w 24v monocrystalline panel that is 32" x 42" purchased on Ebay from The Energy Mill. This is connected with 8 awg cables to a Morningstar Sun Saver SS-MPPT-15L controller, which is connected to the batteries. This setup works pretty well with good sunshine, producing up to 7a at 12v, which helps recharge the batteries, but buy no means keeps up with our daily use. We can usually last 2-3 days before needing a full charge. We replaced the (2) original deep cycle 12v batteries with (2) Costco 6v golf cart batteries. I had to buy slightly taller battery boxes, but they still fit in the same place on the front A frame as the others did.
The panel is attached to the Nash's roof rack using a tilting mount of my own creation. The panel has a length of 1" x 2" aluminum angle iron screwed to each long side. In the corner of each channel is a 2" x 1/4" stainless bolt anchored with lock nuts. The base is made from two 62" x 1" x 2" aluminum channel screwed down to the rack with ss bolts and lock nuts. Where each of the four added solar panel bolts protrude, I mounted stainless boat hinges down to the channel using ss bolts and locknuts. The 1/4" bolts go through the top part of the hinges and anchor with stainless wingnuts. I also fabricated lengths of 1" aluminum in 2' and 3' lengths so the panel can be supported at an angle, which because of the design can be in any direction, even compound angles.
Because of this fortunate location, I was able to snake the cables down the waste vent which is just there at the roof rack location., rather than use the undersized cables provided by Northwood which come up at the front end of the trailer. The cables exit the pipe around eye level and are fished down through the closet into the space under the rear dinette seat. From there, the cables are fed across to terminate in the area under the front dinette seat, where the charge controller and Xantres inverter/charge are anchored.
Here are photos:
Channel with hinges attached to bolts on panel.
Panel shown with longer tilt brackets
Channel is bolted to roof rack
Cables going down waste vent
Brackets for angling panel
Charge controller
Golf Cart batteries
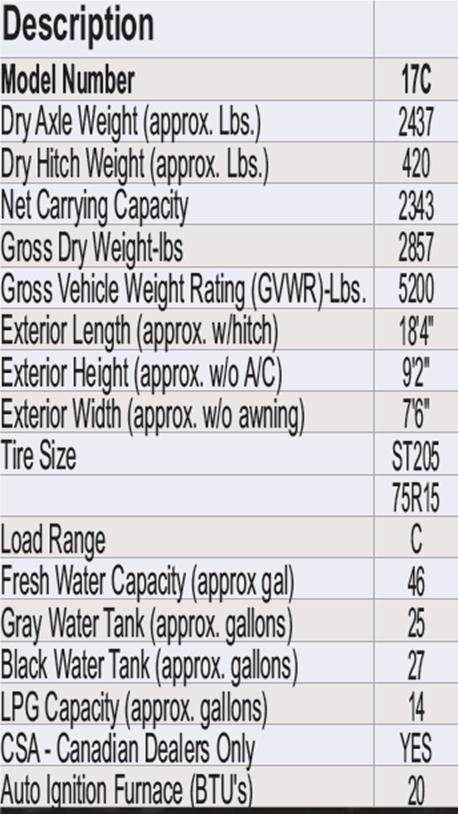
We just recently bought this nifty 2006 Nash travel trailer and sold the Tioga RV after 18 years of family enjoyment. The Nash is light and nimble, yet very well built. While less "spacious" than the Tioga (and certainly many many other huge trailers, 5th wheels and motor homes), it has a great floor plan with plenty of space and storage for our family of three. It is also is easy to pull with our 2006 Toyota Tundra, and relatively easy on the checkbook, gas-wise. Nash is made in La Grande, OR by Northwood Mfg., who also makes the Arctic fox and other trailers and campers.
I will next be posting some of the improvements we've made to the "Nashinator" to make it best suited for our camping style, including a 2000w inverter/charge, 120w solar panel, golf cart batteries, Flat screen TV/DVD, and other storage improvements.
Subscribe to:
Posts (Atom)