The Cabin

The Cabin

Tuesday, June 24, 2014

A New House – Episode 7 - Walls

As the thunder booms over the lake, I thought it would be a good time to pause and reflect. Construction safety 101 – When tilting up a really heavy 16’w x 9’H wall with sheathing, it is always a good idea to have good bracing… otherwise, that big heavy wall might tip all the way over over and nearly crush you as you stand on the ladder beneath it while beating on it with a sledge hammer … hypothetically of course.

Aside from a teaching moment we had today, the project is going well. The floor sheathing is on and 1st floor walls are going up.

P1010365

The floor sheathing is glued and nailed down with ring-shank nails. The glue is polyurethane foam floor adhesive. Great stuff and easy to apply.

P1010367

But be careful to wear gloves, otherwise your hands might become one big mass of polyurethane that has to be “mechanically removed”. Dumbass.

  P1010368

See of the second day I am smart enough to wear gloves!

 P1010370

We successfully repaired the overturned wall and it looks just like new!

The remaining walls will be built without sheathing to reduce weight and simplify and safety-ize the tilting process. The down side is that we’ll have to climb ladders to apply the 4x9 sheets of OSB. Which I hate.

Wednesday, June 18, 2014

A New House – Episode 6 – Gads, Mugsy … I’ve Been Framed!

We had a great visit with Jason and Xin Xin last weekend and took some time off to relax and have some fun fishing, golf, flying the RC planes, and BBQing. We also played some great board games.

P1010329

Jason teaching Xin Xin the basics

 P1010336

Xin Xin mostly played with the cat, but also took time to play with Tucker.

P1010344

Jason caught two nice trout on the lake and we decided to smoke them  to take home.

  P1010353

Flying the RC planes was a blast and we never lost a plane! (crashed a few time though). Dogfight!

When they left, we dove right in to start framing. P1010327

This is our first foray into using engineered lumber to build the house. Engineered lumber is something made by a machine as opposed to just milled like 2x6’s etc. Typically engineered lumber is made from oriented strand board (OSB) or plywood material, and you can get pretty much any length as opposed to dimensional lumber where 20’ is about the maximum. Here we have i-joists (right), OSB rim joists )middle top), and LVL’s (laminated veneer lumber (left). We’re using this material mostly for the floors, but that thicker beam on the left is the ridge beam for the main part of the house (32’ long).

 P1010354

Framing a basement wall.

 P1010355

The tractor helped tilt up the heavier walls.

P1010358

The important walls in the basement are done, so the 1st floor framing can begin. See the nifty arched header going into the TV room?

 P1010361

I can’t convey how great it is to have a wife who is willing and able to lift, haul and hammer right along side me. These 26’ i-joists are part of the 1st floor. 

P1010362

Today we finished framing the 1st floor structure.  7 work days since we started framing. Tomorrow we dive into laying down the 3/4” T&G OSB subfloor, which are in 4’X8’ sheets. Then on to framing the 1st floor walls.

Thursday, June 5, 2014

A New House – Episode 5 – Don’t be a Slab … and Stop Graveling!


… so as I was saying … a couple days after the walls were poured, they came back and started to remove the forms. Surprisingly this took a couple of days because of the cleaning they had to do to reuse the forms.

P1010281

While they worked, we painted the outside walls with that goopy damp proofing stuff.

P1010282

When they left we installed the radon vent pipe and ordered 25 yards of pea gravel (aka “radon rock”) for the interior of the basement under the slab

 P1010284 P1010286

Moving 25 yards or pea gravel BY HAND, is a lot of work for 50 somethings.

P1010318

We also ordered 20 yards of 2” washed rock for the perimeter under and around the perforated drain pipe.   Good thing we have a tractor.

 P1010316

After cleaning out a nice area around the footings, we started by laying down a 2” layer of rock, then laid the 4” perforated pipe on top of that layer and against the footing. The pipe we used had a filter sock on it to keep sediment out of the pipe.

  P1010319

After the pipe was laid, we poured more gravel on top, about 12”. Then another piece of 3’ wide filter material on top of the rock around the perimeter, then more rock on that. After a month, the concrete will be 100% set and we can backfill the remaining amount.

 P1010321

P1010324

Today, the concrete guys came out to pour the slab. Holy cow they were good. Smooth as glass!

P1010328

Yay! now we can start on framing! The tractor really helped with the unloading of the engineered lumber* delivered today.

P1010326

* More about engineered lumber in the next episode … stay tuned.

Saturday, May 24, 2014

The New House – Episode 4 – A Good Foundation is Important in Life

To start with, these series of foundation shots were taken over a period of 4 working days. These guys were good. Holy cow .. it would have taken me at least, what, 6 days to build and pour footing forms and build and pour wall forms. In my dreams.

We hired local company Norvel Concrete to do our foundation. The son, Payton does all the work with two helpers, while owner/dad stays home relaxing or playing golf. Kind of like Goodnight Construction!

P1010255

Monday – Day 1. Build footer forms. It took a while before they could start because the final excavation wasn’t quite done. Brant had not yet dug that 30” trench (on the left above) for the walkout side of the basement. The trench is to allow those footings to be well below grade and the frost line. He also had some overall cleanup to do to give them room to work.
 P1010257

By noon Brant was done with final excavation. By 2,  the forms were built, and by 3 they were poured.

 P1010261

It was a rainy day. The foundation is on a base of clay/gravel, so walking around on it wet is messy.
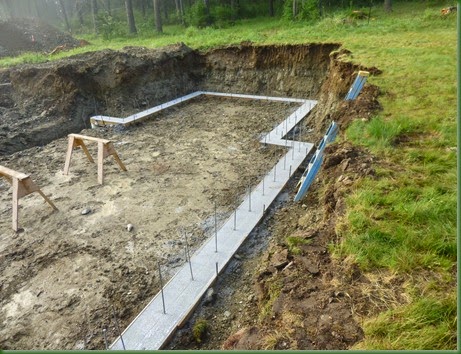
 P1010263

Finished footings with vertical rebar that will go inside the walls.

 P1010265

Day two – Tuesday, footing forms are stripped and work begins on the foundation walls.

P1010267

Since this will be a two-story house, the basement walls are 8” thick. The height will be 8’. They build the wall forms starting with the outside wall, then add the rebar and ties, then add the inside walls.

 P1010272

Day 3 – Thursday - Wednesday was a day off, so the foundation walls were completed on Thursday. This included footing forms for inside load bearing walls.

 P1010273

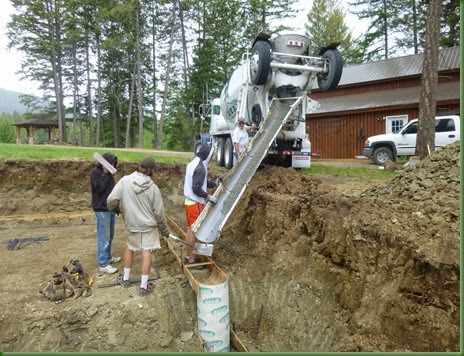
Friday – Day 4, foundation walls are poured.

 P1010277

One helper used a vibrator to allow the concrete to settle and eliminate air pockets. The other helper does the finish floating and adds the J-bolts for the sill plate. Payton (blue tank top) coordinates the pour and gives hand signals to the concrete truck drive to start/stop and move to work down the walls.

P1010279

By mid afternoon Friday, the walls and interior footings are poured. On Monday or Tuesday, the forms will be stripped off and we can do OUR work to install the radon system and inside pea gravel before the slab is poured.

 P1010278

One of our dilemmas is backfilling around the outside of the foundation. The pile of dirt on the left is mostly topsoil, taken from the 1st two to three feet during the excavation. The huge pile of dirt on the right was below the topsoil is a sand/clay mixture taken from below the topsoil. Sand/clay makes great bricks, but lousy backfill because it does not allow water to drain and it swells when it gets wet (i.e., cracked foundation walls). Now if were going to build a cob house, we’d be in great shape – because this soil is perfect for that!

so 3/4 of the dirt we took out of the hole cannot be put back for backfill. We’ll have to buy a bunch of gravel instead. Where to put that clay soil stuff?

Next post: The slab
Tuesday, May 20, 2014

The New House – Episode 3 – milling logs for lumber


We started with a pile of about 25 logs in the 9-13’ range that came from 3-1/2 trees on the property – one that fell onto the gazebo last winter, two 100’ers that were in front of the new house location, and 1/2 of a tree remaining when the top broke off in a storm.

P1010006

P1000360Planning to use this milled lumber for the new house, we hired Mark who owns a “Lucas Mill” which is a swing arm mill. It has a large blade with an 8” cut depth that can cut in both directions, coming and going. Previously, we have hired guys with band mills – like a huge band saw on it side.

 P1010232

Here is a YouTube video showing how the Lucas Mill works.

Lucas Mill video

Mark brought his two sons with him to help mill and sling the wood around. The kids get a cut of the proceeds too. We pay .25 per board foot for the milling service, which includes “stickering” the finished wood into various piles to air dry. .25/bd ft means an 8’ 2x6 costs me $2. At Lowes Depot that board would be about $4.50. The larger lumber is more expensive at the yards, so I also had him mill 2x8, 2x10, 2x12’s and a pile of beams and post material.

 P1010233

 P1010236

One unique thing he milled for us are a bunch of 4” thick x 12” wide natural edge beams that we’ll use for stair treads on log-style stair cases. We’ll need (28) 3’ wide treads.  You can’t buy those at Home Depot!

P1010238 P1010251 

…  a boring 4x12 10’ would cost around $50 each at a store. Mine cost $10... plus they’re cooler.

P1010252

100 Douglas fir 2x6’s stickered (small slats separating the rows) to dry.

Once done, we ended up with 2500+ board feet of good lumber for about $600... a saving over lumber yard costs of over $1500.

General Tools & Instruments LCD Moisture Meter

I bought a new toy …er tool to gauge when the new lumber is ready to use – a moisture meter. Framing with green wood is a gamble. Since the project has launched itself full force, I’ll have to buy quite a bit up front and use the milled stuff down the road.

Next post: foundation

Saturday, May 10, 2014

THE NEW HOUSE – Episode 2 … on broken ground


The new house will sit in an open space near the garage with a great view of the lake. The stakes show the corners of the building. The house really looks small when you lay it out like this – but they are larger when built. Taller too! We received approval for the site plan from the county, so we notified our excavation guy and the foundation folks, that we’re ready to start the project. We’re off to the races!footprint2

In the distance, you can barely see the stumps for the two huge douglas fir trees we took down in front of the house to mill for lumber (next post).

P1010242

On Thursday, Brant Bailey with Hanson Logging brought out his Case 500 backhoe and we broke ground around 10am.

 P1010245

I “helped” a little moving the top soil to a pile separate from the loam. I think it would take 5 of my loads to fill his loader bucket.

 P1010246

The top soil is about 3’ deep then we hit clay/loam which will make a pretty good base for the foundation. not great drainage, but solid.

 P1010249

After two days work we basically have a level pad 48’ wide x 26’ deep, with an area for the walkout.

 P1010250

The house’s basement will be “walkout” style, meaning we’ll have a flat area outside the basement and be able to walk out the basement sliding doors to a patio.

You never know how things are going to look until you do final grading, but we we originally hoping for the flat area outside the basement to remain flat toward the lake… but we don’t have enough grade for that, so we’ll need to have a lowered area surrounded by a rockery. (Similar to brother Dave and Sue’s).

The night Brant finished his second day of excavating, we got a call from the foundation folks (Norvell
Concrete) that they would be available on Monday to start work… yikes!  Brant has about another 1/2 day of work to complete on Monday, but having them both there will really make sure the grading done works well for the foundation footings.


next post: Milling logs to Lumber